2015年1月14日水曜日

Introduction of "iAutoPortrait" [ Page 18 ]

If lightly keep touching the left edge green icon in the bottommost toolbar for a short while, the view which has the two switchs possible to show or hide the navigation bar at the top of the screen and the two toolbars will appear.
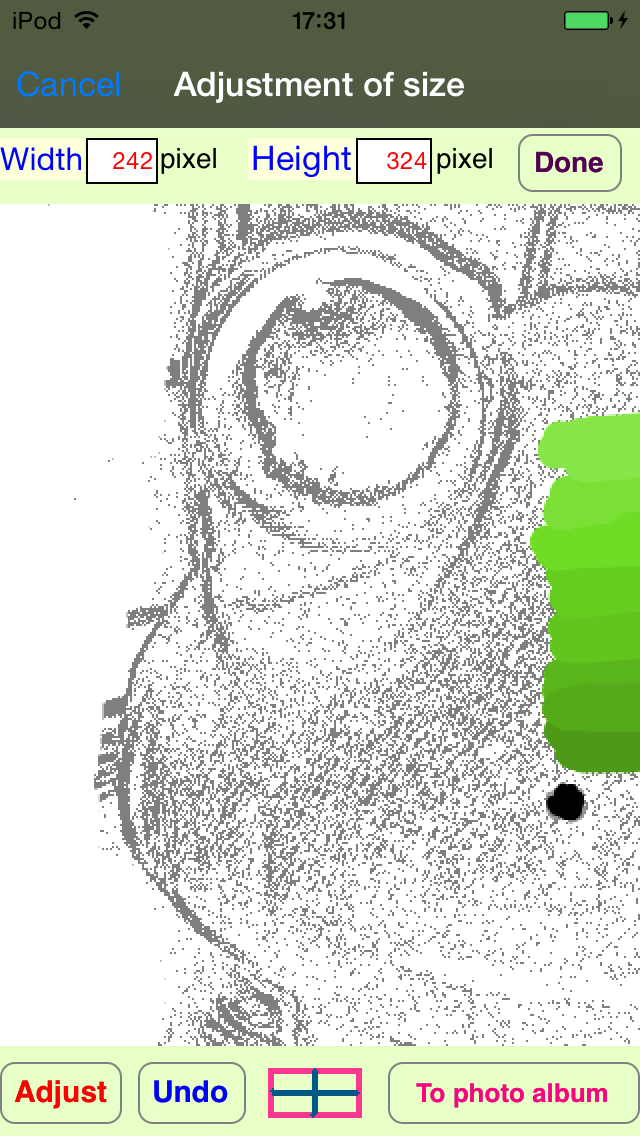
The screen will change to the following image if the button of "Back" is tapped after tapping the switch for hiding the toolbars.


Back Next

© 2015 Mas Software Studio All rights reserved.

Introduction of "iAutoPortrait" [ Page 17 ]

The screen will change to the following image if the button of "Close" is tapped.


Back Next

© 2015 Mas Software Studio All rights reserved.

Introduction of "iAutoPortrait" [ Page 16 ]

Please tap the eraser icon in the toolbar having the arrow icon on both the left and the right.
The screen will change to the following image.


Next if users drag a slider on the semi-transparent small window a little to the right and tap a square on that, the screen will change to the following image.


Dragging the slider to the right will increase the size of the area to be erased with an eraser.

Back Next

© 2015 Mas Software Studio All rights reserved.

Introduction of "iAutoPortrait" [ Page 15 ]

Please tap the forefinger icon in the bottommost toolbar.
The screen will change to the following image.


Next please tap several times the rightmost arrow icon in the toolbar which there is one more on that.
The screen will change to the following image.


Back Next

© 2015 Mas Software Studio All rights reserved.

Introduction of "iAutoPortrait" [ Page 14 ]

The screen will change to the following image of the canvas view if the button of "Choose" is tapped.


Back Next

© 2015 Mas Software Studio All rights reserved.

Introduction of "iAutoPortrait" [ Page 13 ]


The screen will change to the following image if the yellow flower icon in the toolbar which there is one more on the bottommost toolbar is tapped.
Users will find the name of the previously saved file only one in the image file list.


Back Next

© 2015 Mas Software Studio All rights reserved.

Introduction of "iAutoPortrait" [ Page 12 ]

The screen will change to the following menu view if the button of "Menu" is tapped.
Next the screen will change to the following image of the canvas view if the button of "Edit" or "Back" is tapped.


Back Next

© 2015 Mas Software Studio All rights reserved.

Introduction of "iAutoPortrait" [ Page 11 ]

Because a small window called "Alert" that is displayed when the app ask users whether or not to save the image to the photo album will be opened, you can tap the button of "Yes" if you want to save that or you can tap the button of "No" if you don't need to do so.
The screen will change to the following image after tapping that.


Back Next

© 2015 Mas Software Studio All rights reserved.

Introduction of "iAutoPortrait" [ Page 9 ]

For example, the screen has been tapped as follows.


Back Next

© 2015 Mas Software Studio All rights reserved.

Introduction of "iAutoPortrait" [ Page 8 ]

The screen will change to the following image.
A string of the file name will be displayed in the topmost text field if a character on the screen keyboard is tapped.


Back Next

© 2015 Mas Software Studio All rights reserved.

Introduction of "iAutoPortrait" [ Page 7 ]

Please tap an icon that background is yellow in the bottommost toolbar.
The screen will change to the following image.
Next please tap the CD's icon in the toolbar which there is one more on the bottommost toolbar.


Back Next

© 2015 Mas Software Studio All rights reserved.

Introduction of "iAutoPortrait" [ Page 6 ]

The canvas view will be scrolled to the top left corner of the screen, and the bottom right hidden area of the canvas will appear if users flick the screen towards the top left corner of the screen.
Users can confirm the approximate size of a picture drawn by this operation.
Next users can hide the navigation bar at the top of the screen and the two toolbars to confirm the accurate size of a picture.
Please lightly keep touching the left edge green icon in the bottommost toolbar for a short while to hide these.


Back Next

© 2015 Mas Software Studio All rights reserved.

Introduction of "iAutoPortrait" [ Page 4 ]

A taken photograph will be displayed on the screen if the button of "Shot" is tapped.


Please wait as it is until a sketch is finished automatically.


After a sketch has been finished, the view for explaining what can users do then will be displayed.


Back Next

© 2015 Mas Software Studio All rights reserved.

Introduction of "iAutoPortrait" [ Page 5 ]

A sketch will be drawn again if the button of "Back" is tapped.


Back Next

© 2015 Mas Software Studio All rights reserved.

Introduction of "iAutoPortrait" [ Page 3 ]

The screen will change to the following view for previewing if the button of "Choose" is tapped.


Back Next

© 2015 Mas Software Studio All rights reserved.

Introduction of "iAutoPortrait" [ Page 2 ]

The screen will change to the following view for choosing a back camera or a front camera if the button of "Camera" is tapped.


Back Next

© 2015 Mas Software Studio All rights reserved.

Introduction of "iAutoPortrait"


Let's concretely explain the app called "iAutoPortrait" by presenting the text with images.
This app will be launched after tapping the icon of that.
But the canvas view will be displayed for a moment after the title image of that app was displayed first, as soon as the screen will change to the following menu view.
Users will start working every day by using this menu view.
The view in this app expreses the concept of each screen image that changes during screen transition.
In addition, the canvas view in this app indicates the larger canvas than the physical screen.


Back Next

© 2015 Mas Software Studio All rights reserved.

Introduction of "iAutoPortrait" [ Page 65 ]


Let's confirm the color that has been absorbed by using the syringe.
Please lightly keep touching the icon like a table in the bottommost toolbar for a short while.
That icon has been painted in a variety of colors.
The screen will change to the following image if the color palette view has appeared after a finger has been released from the screen.


Users can confirm that a color in the color palette is yellow.

Back

© 2014 Mas Software Studio All rights reserved.

Introduction of "iAutoPortrait" [ Page 64 ]


The screen will change to the following image if the brush icon in the toolbar having the arrow icon on both the left and the right is tapped.


Because a small window is displayed at the bottom of the screen, users can choose the following two items.

Use the current color
Use a color in the color palette

The screen will change to the following image if users tap the item of "Use a color in the color palette".


Back Next

© 2014 Mas Software Studio All rights reserved.

Introduction of "iAutoPortrait" [ Page 63 ]

The screen will change to the following image if users tap the syringe icon in the toolbar having the arrow icon on both the left and the right after tapping the button of "Back".


After this, users tap the yellow area on the screen and absorb this color by using the syringe.
Then a color in the color palette will change to yellow.

Back Next

© 2014 Mas Software Studio All rights reserved.

Introduction of "iAutoPortrait" [ Page 62 ]


Let's confirm the color of the brush when users painted the head of a stuffed frog.
Please lightly keep touching the icon like a table in the bottommost toolbar for a short while.
That icon has been painted in a variety of colors.
The screen will change to the following image if the color palette view has appeared after a finger has been released from the screen.


Users can confirm that a color in the color palette is yellowish green.

Back Next

© 2014 Mas Software Studio All rights reserved.

Introduction of "iAutoPortrait" [ Page 61 ]

The screen will change to the following image if the brush icon in the toolbar having the arrow icon on both the left and the right is tapped.


Because a small window is displayed at the bottom of the screen, users can choose the following two items.

Use the current color
Use a color in the color palette

The screen will change to the following image if users tap the item of "Use a color in the color palette" and paint the head of a stuffed frog with the brush because they use the color of the paint on the screen which has absorbed by using the syringe.


Back Next

© 2014 Mas Software Studio All rights reserved.

Introduction of "iAutoPortrait" [ Page 59 ]

The screen will change to the following image if the button of "Save and Back" is tapped.


Back Next

© 2014 Mas Software Studio All rights reserved.

Introduction of "iAutoPortrait" [ Page 58 ]

Please lightly keep touching the icon like a table in the bottommost toolbar for a short while.
That icon has been painted in a variety of colors.
After a finger has been released from the screen, the color palette view that has such as the sliders, or the plural rectangular regions for distinguishing a color will appear, and the screen will change to the following image after a similar color to green has been made with these sliders.


Users can confirm that the current color is yellowish green.
Let's change this color to yellow.
The screen will change to the following image if the three color sliders are dragged.


Back Next

© 2014 Mas Software Studio All rights reserved.

Introduction of "iAutoPortrait" [ Page 57 ]

If users tap the brush icon that will appear after the leftmost arrow icon in the toolbar having the arrow icon on both the left and the right was tapped once, the screen will change to the following image.


Because a small window is displayed at the bottom of the screen, users can choose the following two items.

Use the current color
Use a color in the color palette

The current color of the brush is green, but the screen will change to the following image if users tap the item of "Use the current color" first of all in order to change that color to the other color.


Back Next

© 2014 Mas Software Studio All rights reserved.

Introduction of "iAutoPortrait" [ Page 33 ]

Please tap the forefinger icon in the bottommost toolbar.
The screen will change to the following image.


Back Next

© 2014 Mas Software Studio All rights reserved.

Introduction of "iAutoPortrait" [ Page 34 ]

The screen will change to the following image if the brush icon in the toolbar having the arrow icon on both the left and the right is tapped.


Because a small window is displayed at the bottom of the screen, users can choose the following two items.

Use the current color
Make a color

The screen will change to the following image if users tap the item of "Use the current color" when they want to make the color of the brush black.


Back Next

© 2014 Mas Software Studio All rights reserved.

Introduction of "iAutoPortrait" [ Page 56 ]

The canvas view will be scrolled to the bottom right corner of the screen, and the top left hidden area of the canvas will appear if users flick the screen towards the bottom right corner of the screen.


Back Next

© 2014 Mas Software Studio All rights reserved.

Introduction of "iAutoPortrait" [ Page 55 ]

The screen will change to the following image if the button of "Back" or "Cancel" is tapped.


Back Next

© 2014 Mas Software Studio All rights reserved.

Introduction of "iAutoPortrait" [ Page 54 ]


The screen will change to the following image if the rightmost icon in the bottommost toolbar is tapped.


Because a threshold value becomes small if the slider is dragged to the left, precision will improve when the contour is extracted from the image.
That is, this app will extract many contours if the slider is dragged to the left.
When a sketch has become dirty because too many contours were extracted, that sketch will become clean if the slider is dragged a little to the right.
Depending on a built-in camera, users may need to adjust the slider from side to side, but they may leave that value almost initial value.

Back Next

© 2014 Mas Software Studio All rights reserved.

Introduction of "iAutoPortrait" [ Page 53 ]

The screen will change to the following image if the button of "To photo album" is tapped.


When this small window was displayed, the image after adjusting the image size will have already been saved to the photo album.
The screen will change to the following image if the button of "OK" is tapped in order to respond to this window.


Back Next

© 2014 Mas Software Studio All rights reserved.

Introduction of "iAutoPortrait" [ Page 52 ]

The screen will change to the following image if the button of "Adjust" is tapped.


Your picture will be reduced to the image size indicated by the values that are displayed in the two fields of width and height while keeping aspect ratio.

Back Next

© 2014 Mas Software Studio All rights reserved.

Introduction of "iAutoPortrait" [ Page 51 ]

After a field of either width or height has been tapped, and a value of either width or height has been set to half of the initial value, the screen will change to the following image if the button of "Done" is tapped.


Back Next

© 2014 Mas Software Studio All rights reserved.

Introduction of "iAutoPortrait" [ Page 50 ]

The screen will change to the following image if the button of "Undo" is tapped.


You'll see that the reduction of the image size has been canceled.

Back Next

© 2014 Mas Software Studio All rights reserved.